No products in the cart.
Marijuana Education
The Life Cycle of Autoflowering Cannabis
Knowing how to properly nurture and care for your autoflowering seeds requires understanding the life cycle of autoflowering cannabis week-by-week.
Autoflowering cannabis seeds are fast growing cultivars. Comparing their sometimes 8-week long growth cycle with the 32-week long growth cycle of some photoperiod strains could lead to poorly developed bud yields.
There are suitable practices for maximizing autoflower yields at each growth stage. This cultivation guide breaks down the autoflower stages by week.
The Stages of Autoflowering Cannabis Growth Week-By-Week in Pictures
Autoflowers are a cannabis variety with the C. ruderalis genetics. This cannabis cultivar is loved for its quick growth cycle, which can also be a problem if you are not adequately prepared for what comes after.
Autoflowering seeds begin vegetative development as early as 3 weeks after germination, finish vegetative development within the next 2 to 3 weeks, start flowering then, and can complete their entire growth cycle in about 10 weeks. As such, you must know when each autoflower stage begins and when it ends to provide the best resources, especially the best light for autoflowers, to avoid wasting valuable growth time.
Below is an autoflower life cycle chart that displays the autoflower growth stages and details what to expect and when.
Kindly note: These signs are only a standard of what to expect as your autoflower seed grow. Your autoflower may show signs that slightly differ from those listed.
THE VEGETATIVE MOMENTS
A few parameters that should stay unchanged during the vegetative phase include:
- Light spectrum: Maintain light spectrum to blue wavelengths to prevent stretching.
- pH: Keep pH at 6.5 in soil and between 5.5 and 6.5 in hydroponics for proper nutrient uptake.
- Ventilation: Ensure proper air circulation and ventilation to avoid CO2 toxicity and heat stress.
- Temperature: Maintain temperatures between 20 and 25 degrees Celsius (68 and 77 degrees Fahrenheit) to lower heat risk.
Week 1: Germination and First Seedling Development
The first week of an autoflower seed is really sensitive. You want to avoid stressing your seeds or them going into shock or they will not germinate or germinate properly.
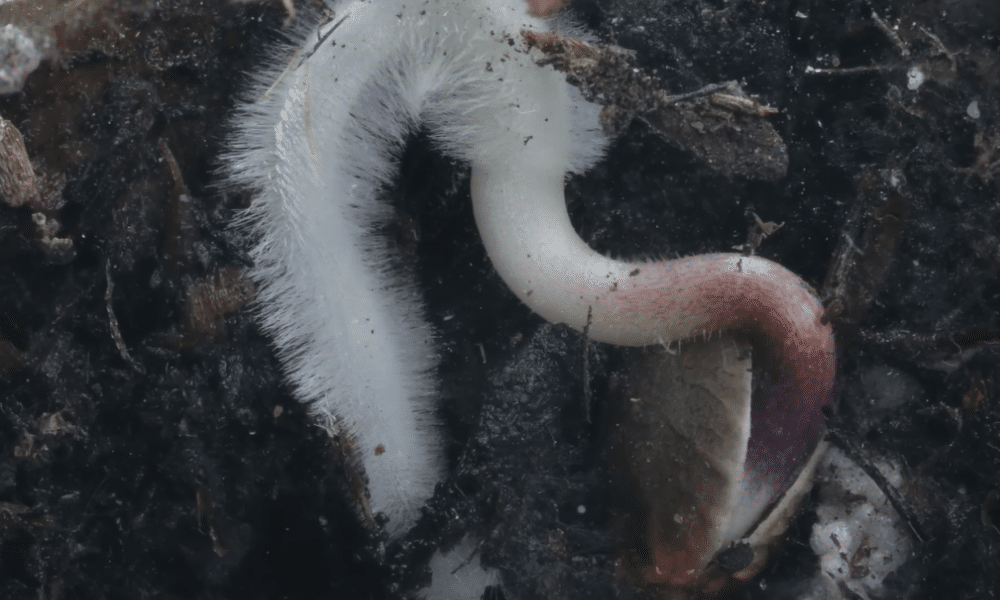
As a result, some autoflower growers prefer germinating their seeds using the paper towel method. This seed germination technique makes it easier to monitor and nurture your autoflowers from seed to sprout.
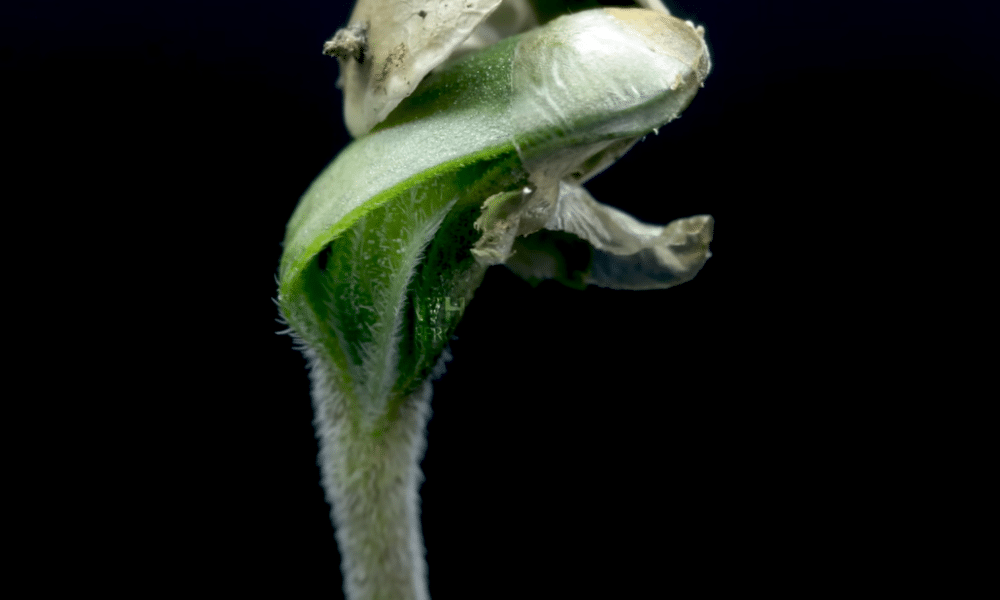
Here’s what to expect from a 1 week old autoflower:
| 1 WEEK OLD AUTOFLOWER | |
| Factors | Expectations |
| How the plant looks | A small autoflower seedling with a few sets of small thin, rounded, pale green leaves on its sometimes single small delicate stem. |
| Things to do |
|
| Things to watch out for |
|
| Nutrients and Watering | A 1 week old autoflower can thrive with the nutrients in its seed or pre-fertilized grow medium. But if you are growing your autoflowers in a neutral substrate, like coco coir, a small dose (about quarter strength)of a balanced fertilizer might be needed.
For watering, only water your autoflower when the top inch (2.5cm) of the growth substrate feels dry or when your autoflower shows signs of dehydration. Watering your autoflowers every 2 to 3 days may work. |
| Lights | An 18/6 light schedule with 100 to 200W LED lights may be sufficient for your 1 week old autoflower. Maintain a distance of 45 cm between the light and the sprout to avoid burning them. |
If by day 7 your autoflower seeds still do not sprout, you very likely have a bad seed on your hands.
Week 2: Seedling Stage
The seedling stage for autoflowers runs for only about 14 days. At week 2 of your autoflower growth, your sprout is almost ready for vegetative growth to begin. Week 2 of your autoflower life cycle is its late seedling stage.
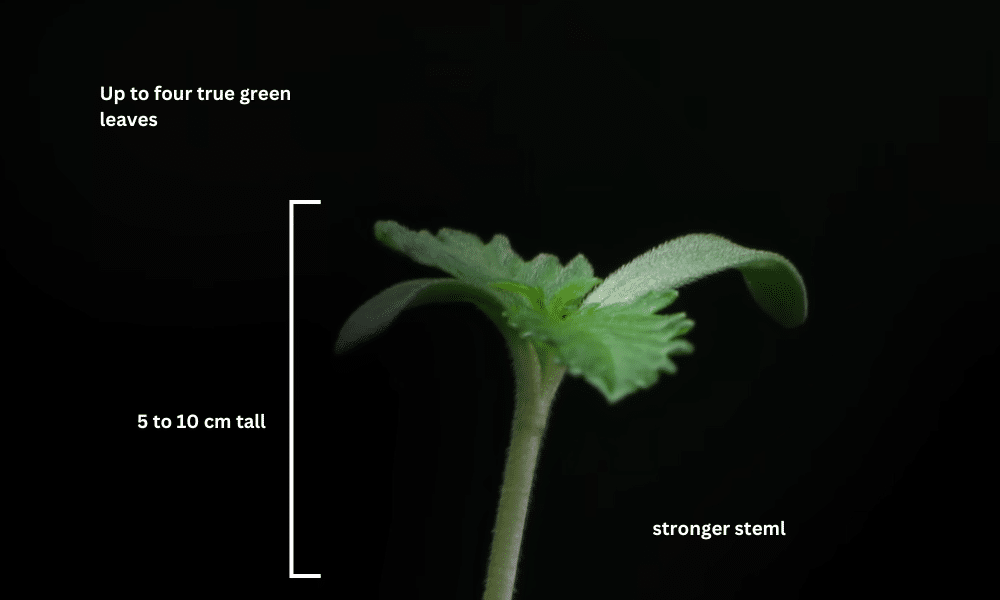
Some of what to expect from your 2 week old autoflower:
| 2 WEEK OLD AUTOFLOWER | |
| Factors | Expectations |
| How the plant looks | A noticeably taller plant (5 to 10 cm tall) with a stronger stem and a more compact growth. About 2–4 true, serrated leaves with a vibrant green color alternate along its stem. |
| Things to do |
|
| Things to watch out for |
|
| Nutrients and Watering | Start light feeding your autoflowers with vegetative (grow) nutrients (N-P-K, with more NITROGEN). A 3-1-2 ratio works; but administer only half the strength of the recommended nutrient dose. Also, regulate feeding to about every 2 to 3 days. However, look out for nutrient deficiencies or excesses and adjust accordingly.
Apply water sparingly still. |
| Lights | Maintain lighting conditions |
You can always tell when your autoflower is done with the seedling stage when you can spot full-fingered photosynthetic fan leaves.
Week 3: Early Vegetative Stage
Week 3 is basically the teenage years (or weeks) of your autoflower. Your autoflower now has better-established roots and its input demands grow as it grows bigger and taller. You want to take particular care of your autoflowers at this stage due to the amount of changes that have to occur here.
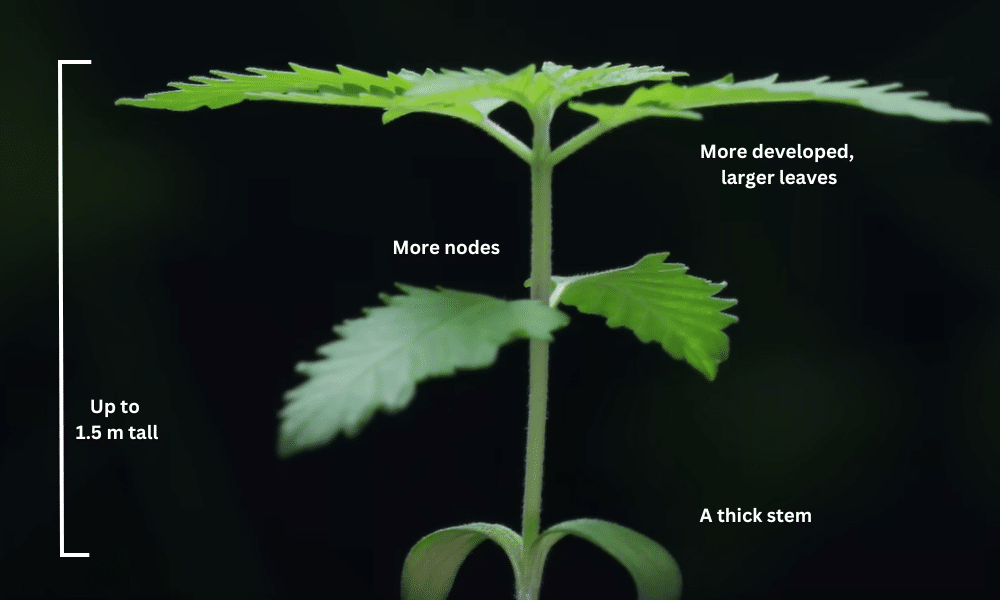
Here’s what to expect from your 3 week old autoflower:
| 3 WEEK OLD AUTOFLOWER | |
| Factors | Expectations |
| How the plant looks | An even bigger plant that may be up to 1.5 meters tall. A thicker stem with more developed, larger leaves and well-formed true leaves with distinct serrated edges. A 3 week old autoflower begins to take on a bushier look as more nodes develop along its stem and you may spot its early preflowers (early gender signs) at the nodes. |
| Things to do |
|
| Things to watch out for |
|
| Nutrients and Watering | Gradually increase nutrient feeding concentration to match the nutrient needs of your autoflower. Nitrogen remains highly relevant, and you can follow the manufacturer’s recommended nutrient dosage. But monitor your autoflower’s response and adjust feeding levels accordingly.
You may increase watering levels to around 500 ml per day. But, the amount of water your 3 week old autoflower needs depends on the pot material and size, cultivar, ambient temperature, etc. |
| Lights | Maintain lighting conditions. Keep the 45 cm apart distance by adjusting the height of the light supply to avoid light burn. |
Week 4: Late Vegetative Stage
Week 4 of the autoflower growth cycle is like the final formative years of your plant. At week 4 of your autoflower grow stage, your autoflower starts to put a cap on all things vegetative development as it readies for flowering.
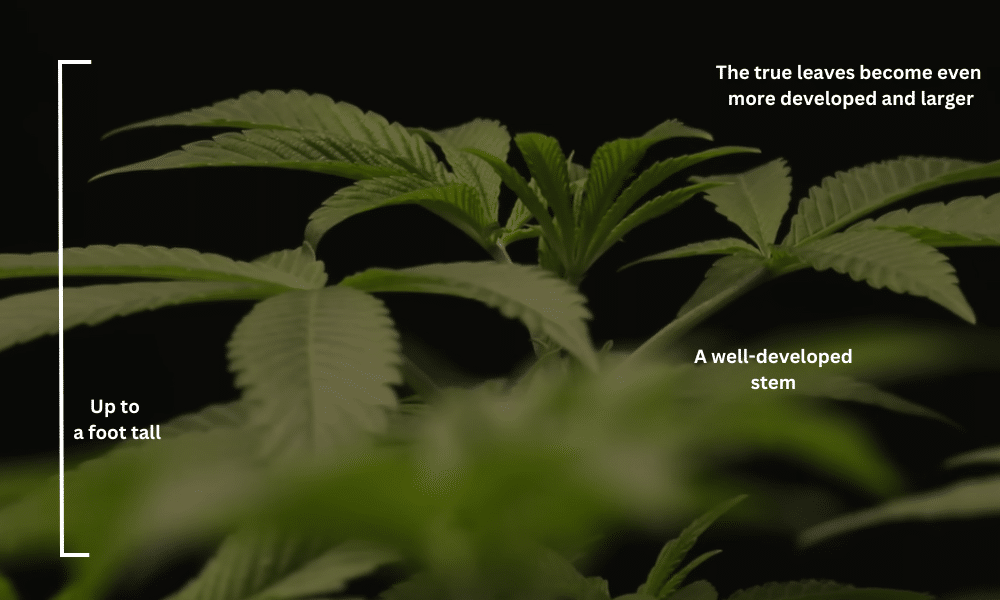
Please note, that once your autoflower moves into flowering, you cannot return to the vegetative phase. So, be sure to make the most of these final weeks of vegetative development. Here’s some of what you can expect with a 4 week old autoflower:
| 4 WEEK OLD AUTOFLOWER | |
| Factors | Expectations |
| How the plant looks | A 4 week old autoflower grows even taller and might reach even a foot tall here. Its stems thicken further and more nodes for more leaves form along its stem. The true leaves become even more developed and larger; at the nodes, you may begin to see potential bud sites or preflowers. |
| Things to do |
|
| Things to watch out for |
|
| Nutrients and Watering | Increase balanced nutrient levels but do not switch to higher levels of potassium and phosphorus until you are satisfied with your autoflower’s vegetative development.
Maintain watering schedule. |
| Lights | Maintain lighting conditions. |
The vegetative stage for autoflowers only lasts about 3 to 4 weeks.
THE MOMENT IN BETWEEN
Week 5: Pre-Flowering Stage
Ah! The sweet pre-flowering stage where it all becomes clearer.
At the pre flowering stage, you can already start to see a mature plant; gender signs and all. As such, it is easy to rush into applying flowering phase grow tips. But, just wait a little while longer before you begin flowering treatment if you want to further increase your autoflower yields.
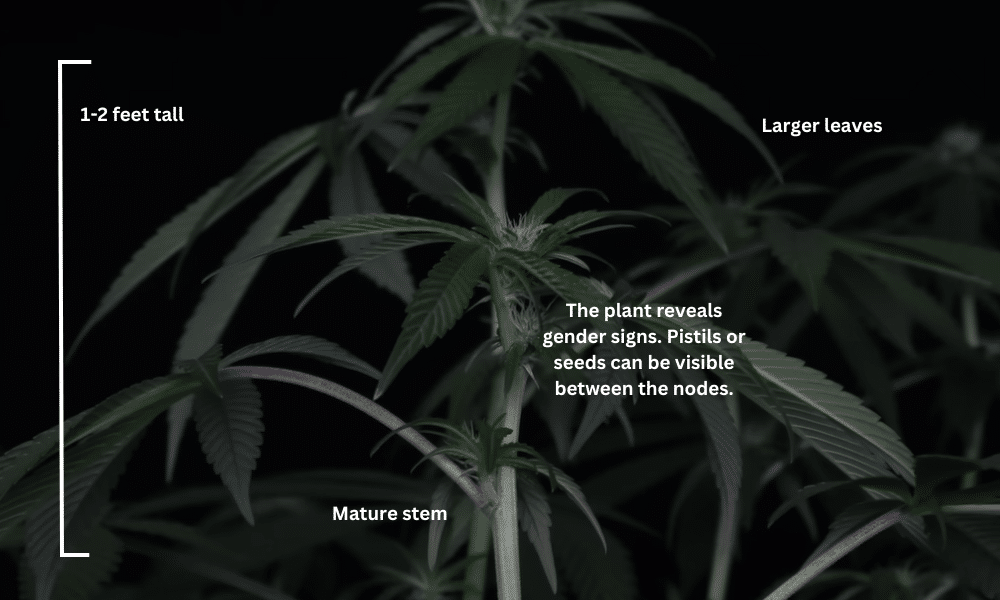
Here’s what to expect from a 5 week old autoflower:
| 5 WEEK OLD AUTOFLOWER | |
| Factors | Expectations |
| How the plant looks | A 5 week old autoflower may be as tall as 1 or 2 feet, depending on the strain. Explosive vegetative development occurs at week 5, with more leaf sets, larger leaves, thicker stems, and multiple nodes. Preflowers and bud sites become even more obvious at week 5 of an autoflower growth cycle. So, if you are looking for a time to identify female plants from the males, you want to do it in week 5. |
| Things to do |
|
| Things to watch out for |
|
| Nutrients and Watering | Unless you are satisfied with your autoflower’s vegetative development, do not switch to bloom-specific nutrients (higher levels of potassium and phosphorus) yet. Most cannabis growers recommend sticking with growth-specific nutrients (nitrogen-rich) a while longer to maximize vegetative development.
Maintain watering amounts at 500 ml per day. |
| Lights | Maintain lighting conditions or switch to HPS lights and a red wavelength-rich light spectrum if satisfied with your autoflower’s vegetative development. |
FLOWERING BEGINS
Some key parameters that should stay unchanged during the flowering phase include:
- Light spectrum: Maintain light spectrum to red wavelengths to encourage bud density.
- pH: Keep pH at 6.5 in soil and between 5.5 and 6.5 in hydroponics for proper nutrient uptake.
- Ventilation: Ensure proper air circulation and ventilation to avoid CO2 toxicity and heat stress. You can integrate carbon filters into your ventilation system for odor control.
- Temperature: Keep temperatures between 20 and 25 degrees Celsius (68 and 77 degrees Fahrenheit) to minimize heat stress.
Week 6 to 7: Flowering Stage. The One That Smells
According to a poll we ran, a majority 25.9% of growers report that their autoflowers typically start flowering less than 8 weeks after germination.
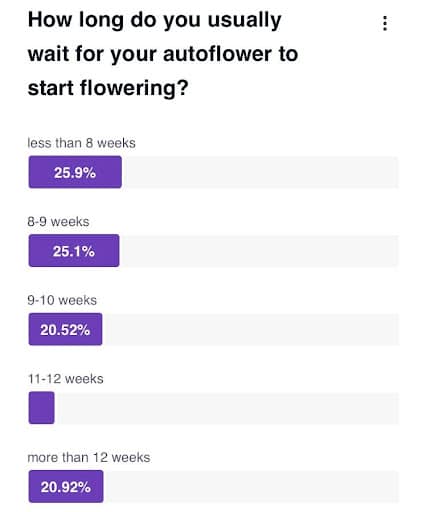
Between weeks 6 and 7 of your autoflower growth cycle, your autoflowers have stopped growing in height and you should expect to see and smell the satisfaction of all your efforts leading up to that moment. However, sometimes, your autoflower may take longer to start flowering as the closely varying results in our poll suggests.
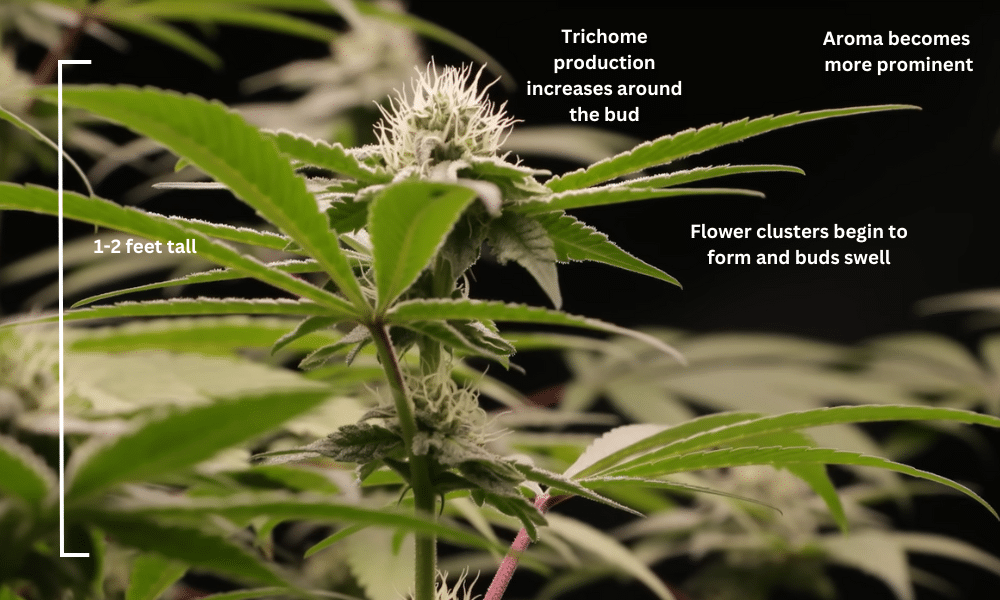
When your autoflower is in the early flowering stage, vegetative development declines. So, you need to be extra careful about inducing any unnecessary stress at this point. Here’s a few of what to expect from a 6 to 7 week old autoflower:
| 6 to 7 WEEKS OLD AUTOFLOWER | |
| Factors | Expectations |
| How the plant looks | A 6 to 7 week old autoflower has typically attained its full height. Flower clusters begin to form and buds swell. Trichome production increases around the bud and surrounding foliage and the lower leaves start to yellow or brown. As the autoflower matures, its aroma becomes more prominent. |
| Things to do |
|
| Things to watch out for |
|
| Nutrients and Watering | Your autoflower now needs bloom-specific nutrients; with higher levels of potassium and phosphorus. You can use dried, powdered banana peels as a homemade recipe for adding potassium to your autoflowers.
Increase watering amounts to 1.5 liters per day. But, adjust watering levels according to your plant’s response. |
| Lights | Switch the light cycle to the 12/12 schedule. |
Week 8 to 9: Late Flowering. The Harvest is Around the Corner
Some Autoflowering strains reach harvest around this time, while others take a little longer to complete their flowering and be ready for harvest.
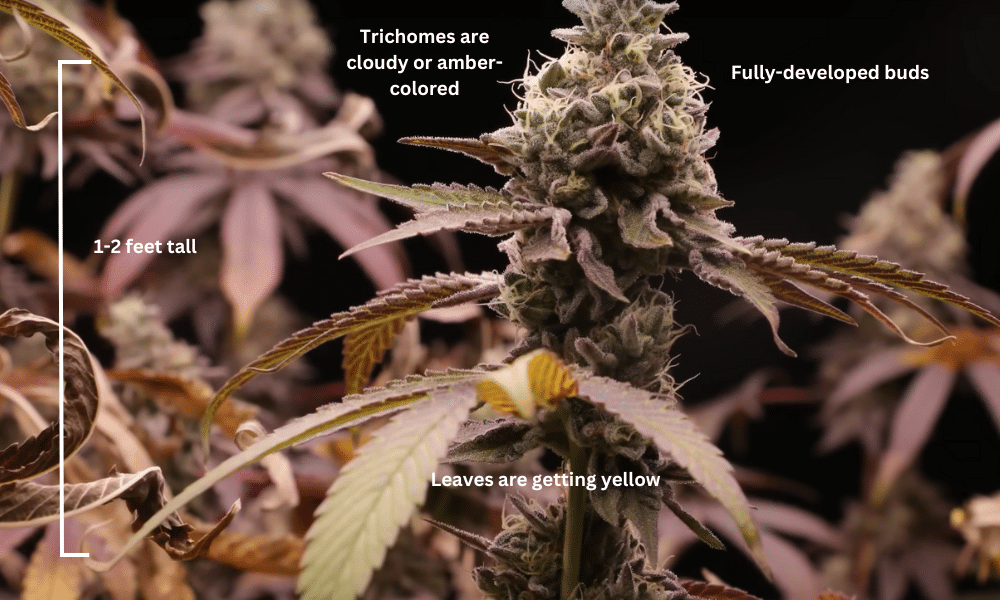
For a typical Autoflowering cannabis that completes its growth in 10 weeks, here’s what you can expect from an 8 to 9 week old or a 2 month old autoflower:
| 8 to 9 WEEKS OLD AUTOFLOWER | |
| Factors | Expectations |
| How the plant looks | An 8 to 9 week old autoflower typically has matured, fully-developed buds with dense clusters of resinous flowers. Trichomes are usually cloudy or amber-colored at this stage and more leaves fade and turn yellow. Autoflower buds continue to swell and fill out at this stage.
At weeks 8 to 9 of your autoflower growth cycle, the aroma of your flower becomes more intense. For female autoflowers, white pistils turn darker. |
| Things to do |
|
| Things to watch out for |
|
| Nutrients and Watering | Keep using bloom-specific nutrients; with high levels of phosphorus and potassium to fatten autoflower buds.
Maintain watering amounts at 1.5 liters per day. But, regulate watering levels according to your plant’s response and consider flushing your autoflowers during the final week or two before harvest to improve the quality of your flower. |
| Lights | Maintain lighting conditions or increase the light spectrum to include more red wavelengths as your autoflower requires. |
WHAT IS FLUSHING?
Flushing is the process of washing off nutrients and other chemicals. However, we found that not all cannabis growers agree to the process of flushing their autoflowers. Some growers prefer simply lowering nutrient levels towards harvest instead of flushing. However, those who flush their autos prefer to start flushing about a week before harvest to turn their plants’ pistils.
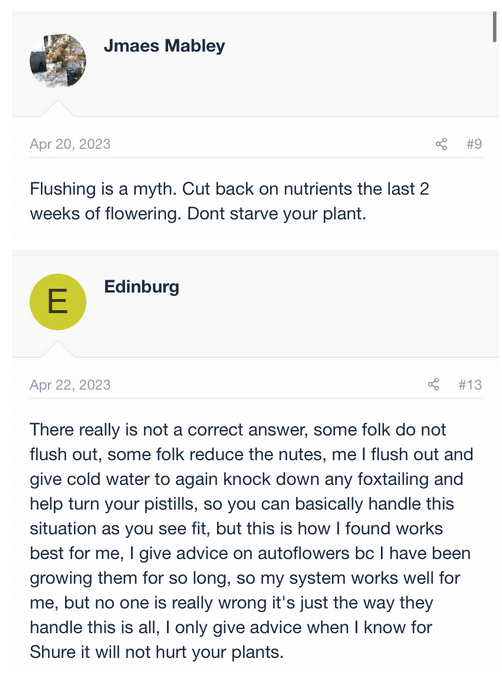
Other times you can flush your cannabis plants or autoflowers include:
- When switching nutrient types; from growth nutrients to bloom nutrients
- If your cannabis plant is experiencing a nutrient lockout
Week 10: Harvest Time
Finally, the moment we’ve all been waiting for; harvest. Most autoflower life span ends at week 10. But if your autoflower is taking longer, don’t fret. Some autoflowers have long growth cycles.
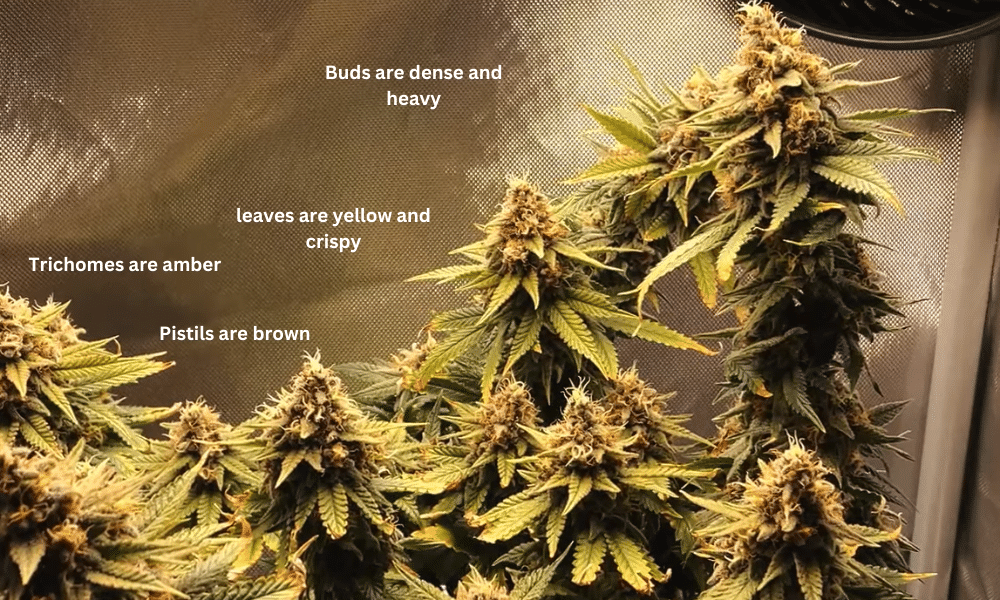
You can tell when to harvest your autoflowers by checking for the tell-tale signs of a fully-developed autoflower. A bit of what to expect from a ready-to-harvest 10 week old autoflower include:
| 10 WEEK OLD AUTOFLOWER | |
| Factors | Expectations |
| How the plant looks | A 10 week old autoflower should have fully developed, dense, resinous buds. Its secondary fan leaves continue to turn yellow and wither. Trichomes have a mushroom shape when viewed through a jeweler’s loupe and change color to a milky white. The pistils become darker and curl inwards. |
| Things to do |
|
| Things to watch out for |
|
| Nutrients and Watering | Reduce nutrient feeding to allow your autoflower to use the residual nutrients in the growth substrate.
Some cannabis growers choose to flush their autoflowers at this stage. The amount of water needed to flush your autoflowers will depend on various factors, including pot size and substrate type. |
| Lights | Maintain the 12/12 light schedule, but about a week or few days before harvest, keep your autoflowers in consistent, uninterrupted darkness to improve resin production and preserve terpenes. |
Your Autoflower is Not Flowering? Here’s What to Do
The problem isn’t that your autoflower hasn’t gotten to harvest. The problem is your autoflower hasn’t even started flowering at week 5?! What do you do?
It is pretty common for autoflowers to not flower at the expected time. Our poll says as much; about 40% of growers reported that they have experienced their autoflowers not flowering as expected.
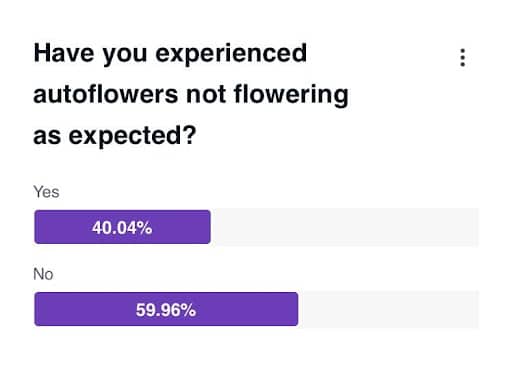
So, why is it so common for autoflowers not to flower at the expected time? Why might your autoflower not flower at the expected time?
- You are planning the growth cycle of your autoflower with the wrong seed genetics: Some autoflowers naturally take longer to flower than others. Do not compare the flowering time of Bear Dance Autoflower seeds to the flowering time of Tangerine Dream Autoflower seeds.
- You actually have a semi-auto: Your Autoflowering seed may not be a pure auto and might instead be a semi-auto; a cannabis hybrid of a photoperiod and an autoflower. So when choosing autoflower seed genetics, go with reliable seed banks that offer accurate cultivar details.
Now, what do you do if your autoflower is not flowering as expected? You have two options:
- Wait the process out; until your autoflower starts flowering on its schedule.
- Induce flowering with a little light cycle change.
FAQ Section
Can autoflowers take longer than 10 weeks?
Yes, autoflowers can take longer than 10 weeks to flower fully. The duration of your autoflower growth cycle depends on several factors, from seed genetics to growing conditions.
How do I know when my autoflower is done growing?
The signs your autoflower is done growing are quite similar to what you’d see with photoperiod cannabis. The trichomes become cloudy, buds become denser, leaves turn yellow and fall, etc.
Does autoflower need darkness?
Autoflowers do not need darkness like other seed genetics. But at the flowering stage, autoflower, like every other cannabis genetic, could do with a little darkness for better flavors.
How many times can I harvest autoflower?
With progressive harvesting, you can harvest autoflowers up to twice to get the most out of your autoflower buds. Just make sure to wait at least 1 to 2 weeks before harvesting the next batch of buds.
Why did my autoflower produce seeds?
If your autoflower produced seeds, then it is most definitely pollinated. You can avoid your autoflower producing seeds by growing feminized Autoflowering seeds or spotting male cannabis plants early.
What triggers flowering in autoflowers?
Autoflowering cannabis plants initiate flowering based primarily on age and genetic programming, rather than changes in light cycles. Typically, autoflowers will begin flowering after a certain number of weeks, regardless of the amount of light they receive. This genetic trait allows autoflowers to transition from the vegetative stage to the flowering stage more rapidly than photoperiod plants, making them popular among growers seeking quicker harvests.
Why are my autoflower buds airy?
If it’s your first time growing sativas, you may be just used to the denser buds of indica cultivars. But if not, your autoflower buds are probably airy because your plant has been stretching.


