No products in the cart.
Marijuana Education
How and When to Transplant Cannabis Plants
Growing cannabis plants is easy to learn and nearly impossible to master, but the journey is what keeps growers learning each time. Transplanting marijuana plants into new pots is one of the most challenging tasks to complete.
Transplanting cannabis happens as soon as you’ve germinated seeds and is required all throughout the different stages of the life cycle. It is a sign of a healthy root system and can be extremely fun for new growers to explore.
What does transplanting cannabis mean?
You’ll want to transplant your cannabis plants when they are ready to move to a bigger pot. This process happens every time the roots have outgrown the current growing medium, usually a couple of times before the flowering stage.
It involves removing the root ball from one pot and moving it into a larger pot already filled with the same or similar growing medium. The idea is to give the root growth as much room as possible in order to prevent creating a rootbound plant. As the roots grow, the plant grows with them, and more space is needed to provide a strong infrastructure.

Can you transplant autoflowering plants?
Technically, it is possible to transplant autoflowering strains, but it needs to be done within 2 weeks of germination. The amount of time it takes for weed plants is precious for an autoflower to develop since they start flowering within 5 weeks.
Because the roots are so fragile and can break with the slightest movement, it takes a skilled hand to move them. Most growers will just start their autoflower seeds in their final container instead.
Why is transplanting marijuana plants so important?
Some people wonder if transplanting is really worth doing at all since it introduces a significant amount of stress to the plant. While it’s up to the individual grower whether or not they should transplant, here are some reasons why it’s a good idea.
Increases yields. Transplanting cannabis provides more room for the roots to grow. This maximizes the potential for leafy growth and large bud sites later on.
Mitigates root bound plants. When the healthy roots have no place to grow, they will start to grow along the edges of the plant. Since the root system can’t keep up with the continued growth above, it will start to choke out the plant.
Prevents mold and disease. Root diseases such as Pythium and Fusarium will cause healthier plants to die very quickly. Root-bound plants tend to have poor drainage holes, so the liquid will get absorbed into the roots instead.
For more information on transplanting seedlings check out our article on cannabis seedling temperature and humidity.
How often will you need to transplant marijuana plants?
Each growing cycle should yield between two and three transplants. Also, remember to give the weed plant some time to recover and rest. This will promote quick root growth and boost vegetative production.
Generally, you will transplant up until the end of the vegetative cycle when the plant switches from working on roots and leaves to creating dense buds. You’ll notice that you’ll never really see a grower transplanting during the flowering stage. This is because any damage to the roots or leaves won’t grow back properly and can end up damaging the plant.

The first transplant of a cannabis plant
The first transplant happens when you move your germinated seed over to its first container, usually a solo cup or a small 1-gallon container. This will then sprout up and turn into a seedling, where it will stay for up to 4 weeks until it’s ready for the next transplant into a bigger container.
Additional transplants
In general, most growers will put their plants in a 1-gallon pot, move them up to a 3- or 5-gallon pot, and then finish in a 10-gallon pot. If you notice that your root ball doesn’t have enough space, you might need to transplant it more often.
When should you transplant marijuana?
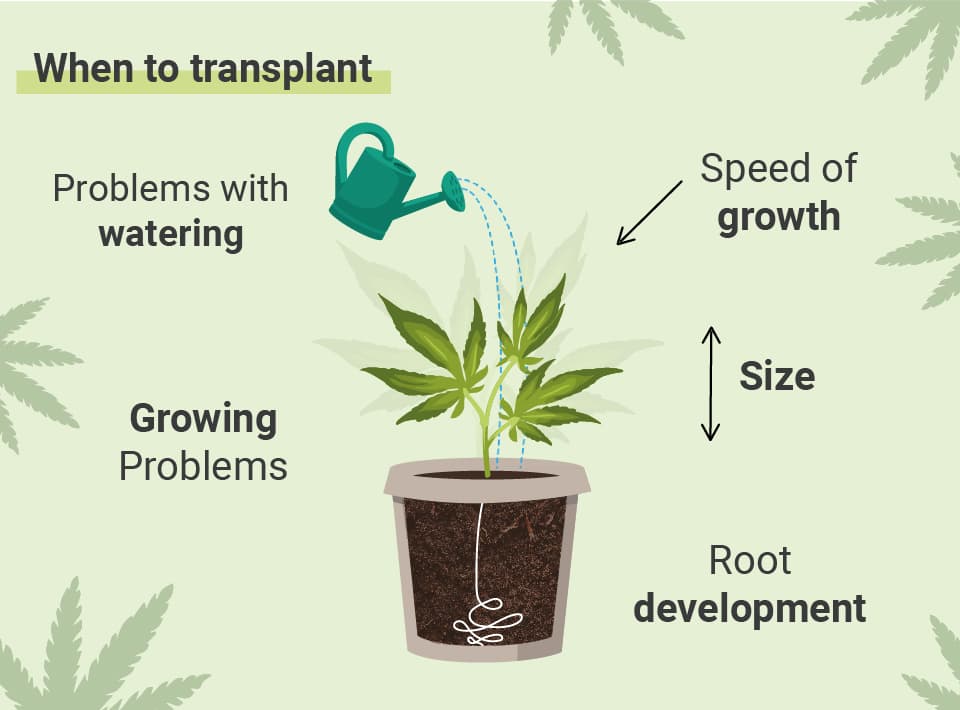
Timing is crucial when it comes to transplanting cannabis plants because you want to avoid any errors that could be damaging. Remember to only transplant healthy plants to not further stress out weakened ones.
The first vegetative stage transplant will be into a larger container about 4–8 weeks after germination. To give the plant enough time to recover, the second vegetative phase transfer happens about two weeks before it starts to flower.
These deadlines are not absolute, and several conditions must be met before a successful transplant can be carried out. This includes advanced root development and visual cues from the fan leaves themselves.
End of the vegetative stage
As a rule of thumb, your flowering cannabis plants will not be in the same pot that they spent their vegetative phase in. One transplant should occur right before you switch your young plant to the flowering phase, about two weeks.
This gives the plant’s roots enough time to grow all the way to the bottom of the final pot before growth changes and the plant starts to flower. Transplant shock can disrupt the budding flowers and affect your final yield.
Root development
There is nothing quite like seeing the root ball of your plant sprout beautiful, white roots throughout your pot. It’s another thing to see those roots growing out of the drainage holes in your pot, as this is usually a sign that you need to transplant the potted plant into a new pot before it becomes root bound.
Number of leaves
Some beginner growers question when to transplant cannabis seedlings and the leaves will tell you the perfect time to move them. If you look at how your plants grow, you’ll notice nodes in between the sets of leaves, and this makes a great indicator of when to transplant. It is time to transfer it to a bigger pot once the fifth set of leaves or five nodes show up.
How to transplant marijuana plants
Transplanting cannabis plants is easily approachable by anyone and just takes a little practice to get right. The premise of moving a marijuana plant to a new container is fairly simple and can be successful the majority of the time.
However, there are some problem areas that you need to be aware of that can result in slow growth, stunted growth, and even completely disrupt the cannabis growing process.
What do you need to prepare
Transplanting cannabis requires minimal materials and can be done with simple gardening implements. Here is a list of what you’ll need to get started moving your plants around.
- Small garden shovel or trowel
- The new pot filled with the growing medium of choice
- Nitrile or gardening gloves
- Stakes to help hold up floppy plants afterward
- Water for the newly transplanted cannabis plants
Make sure to give yourself enough space so that you don’t knock the plant around while moving it. Keeping a clean workstation ensures that bacteria or pathogens cannot make their way into your weed plants.
How to choose the right pot size when transplanting a cannabis plant?
You won’t get very far by following only general instructions for transplanting cannabis plants; instead, you need to pay attention to the specific height and development that your young plants will be exhibiting. According to how your plant is growing, here are some suggestions for pots to use.
| Pot Size (volume in gallons) | Height of the Plant (in inches) |
| 1 Gallon | 0-12 inches |
| 3 Gallon | 12-24 inches |
| 5 Gallon | 24-48 inches |
| 10 Gallon | 48-64 inches |
| 20 Gallon | 60+ inches |
Why not start with the largest pot?
Aside from autoflowering plants, you want to transplant your cannabis as needed. A small seedling’s roots are thin and need a small space to grow and build the foundations it needs.
If you start your small plants in bigger pots then they won’t be able to soak up the water, which can lead to root damage and even suffocation. How much space your current container has should be relevant to the height of the plant, and in turn, the root system underneath.
Transplanting cannabis seedlings
The important thing to remember is to wait until your plant has developed its fifth set of fan leaves. Keep the climate consistent with what the seedling requires to avoid transplant shock. By raising the humidity, you can keep more water in the air and reduce the stress on your cannabis plants when you move them.
Set aside some time to focus on your seedlings as once you’ve started, it is wise not to stop since the roots should be buried as quickly as possible.
Step 1: Sterilize the area
Wash your hands and the area where you will be transplanting your cannabis seedlings. Once washed, make sure to rub the area down with isopropyl alcohol for sterilization. Wearing your gloves at this time is also a good idea.
Step 2: Soil preparation
If your soil is too dry then feel free to add some water to moisten it. The idea is not to soak the soil so it’s clumpy but to give it enough water so that it is soft and loamy. It will then give the plant enough water without making the roots work harder to absorb it.
Step 3: Prepare a new pot
Fill the new pot with the damp soil and be sure to tamp it down to get rid of any large air pockets. It is best not to push the soil down since seedling cannabis roots don’t like to push through dense growing mediums. Compacted soil also decreases drainage and acts like a root-bound pot, increasing the amount of transplant shock you’ll encounter.
Step 4: Give your plants a good watering
Providing adequate water gives your seedlings everything they need while they bounce back and grow stronger. After a transplant, watering your cannabis is best done gradually until it begins to leak out of the bottom of the pot. You want it to feel soft and loose, not like big, wet chunks, just like when you’re preparing the soil.
Step 5: Sterilize the area
Always clean up and re-sterilize your work area once you’ve completed the transplant. There will be soil and other particulate matter everywhere that, if left to their own agenda, can turn into molds or other pathogens that can be transferred over to your plants.

Vegetative transplanting
Transplanting cannabis in the vegetative phase follows roughly the same guidelines. The roots should be more robust as a nicely sized root ball should have started to form. Take care not to tear any of the roots as you remove them from the old container.
Step 1: Prepare a sterilized area
Ensure that you have an area that is free from debris and other clutter. Wipe down your work surface with isopropyl alcohol as the final step. Some growers go as far as putting a sheet of plastic on the ground to catch any errant soil particles.
Tools should be sitting in hot water prior to transplanting for sterilization purposes. As an added precaution against disease, wipe your tools with some alcohol right before.
Step 2: Prepare pot and soil
This is an excellent opportunity to take off any yellow or dead leaves that are still on your plant. Your larger pot should be filled with soil that is thick and loamy and not muddy.
Step 3: Spray a little water
Some growers mist their cannabis plants as they move them to make sure they get all the water they need. As long as you have properly watered your plant, it should have no trouble bouncing back.
Step 4: Seat the root ball in the hole
Grab the plant’s stem, flip it upside down and pat the sides of the pot to coax the plant out. If your young plants have tall growth then be sure not to break the branches on anything.
To finish the transplant, simply put the plant into the hole and ensure it is flush with the top of the soil layer, filling in as you go.
How to avoid cannabis transplant shock
Cannabis growers who are just starting out are afraid to move their plants because of the risk of transplant shock. A lot depends on the plant’s genes and health, since crops that aren’t as healthy will be more likely to get sick.
Common symptoms of this problem are stunted growth and small flowers. The root system is what provides the plant with what it needs to perform properly. Once you disrupt the flow of the roots the plant goes into stasis until it sorts itself out or fails to push forward.
Most of the time, the shock happens when you put the roots in a completely new environment. The nutrients, PH, humidity, and even soil compactness are all foreign to it and it needs to proceed with caution.
Since you are in charge of every aspect of the transplanting environment it is important to keep it as consistent as possible. The smaller the change the less your plant has to adapt and the faster it can get back to producing and growing.
Here are some additional tips to help you avoid transplant shock after transplanting your plant:
- Ensure that the growing medium (soil) that you’re transplanting into has the same EC and PH to minimize the impact on young plants. In fact, make sure it’s the same soil as the current container.
- Complete the transplant quickly so that the roots have the least amount of time exposed to the air. Light can also damage roots so it’s best not to do this under a grow light.
- Prune or pull off dead plant material as they take energy away from the plant.
- Try not to touch the roots as you transplant the weed plants between containers; they are fragile and might break.
- If you notice a problem with your seedlings after transplanting be sure to check out our article on cannabis seedling problems
If you’re just starting out don’t let transplanting cannabis plants intimidate you. Keep your plant healthy and try not to handle the plant too much during transplanting and you should have an easy time with it.
What should you do after transplanting?
Regardless of how quickly you transplant cannabis plants, there will always be some amount of stress that’ll affect the plant. The goal is to minimize that stress so it has an easier time bouncing back.
These are some of the things you can do for your marijuana plants after moving them:
Avoid any low-stress training. Topping your cannabis plant or bending its stalks would add too much stress to a weakened plant. It’s best to wait until you see new growth coming before attempting any training.
Give it ample support. Cannabis will sometimes flop over after a transplant as the root system sorts itself out. Using stakes or a tomato cage will keep the plant upright and able to absorb any light it needs.
Wait a couple of weeks to change light cycles. There’s a reason you want to stop transplanting a couple of weeks before you change your cannabis plants over to the flowering stage. The shock of the transplant can delay the onset of pre-flowers which further delays the rest of the life cycle.
Do not overwater your plants. You might notice that your cannabis plant will drink less water in the days following a transplant. You might be apt to follow the schedule and keep watering your pot but you should pay attention to the soil moisture and if your plant is showing signs of stress.
Frequently, you will need to water the plant less for a few days until growth picks back up and it requires hydration.
If you had good genetics and took care of your cannabis plant then you should start to see some positive results within a couple of days.
There is the odd time when the plant will show signs of stalling for longer than you’d expect. If it’s been more than 14 days it might be time to check the roots and see if they’re still in good health.
How should you feed a cannabis plant after transplanting
Once you’ve moved your weed plants into their new home it’s time to resume a feeding schedule. The best method is to use the same nutrient formula you were using before you transplanted. It has everything the plant needs and won’t be such a shock to the root system.
Testing the soil you used for your cannabis plant can help ensure that the nutrient content and PH levels are correct. Having a PH meter and an EC reader will make this task a lot easier.
Here is a simple way to test your soil for nutrition and PH:
- Pour a couple of cups of distilled water into a bowl and mix a handful of old soil into it. Use the EC and PH meters to measure the various metrics and perform the same task with the new soil. As long as the readings fall within the same parameters your plant should be fine.
It’s important to watch your cannabis plant for any nutritional deficiencies or toxicities in the week following a transplant. As the plant gets better, nutrient lockout, stress, and overwatering can cause a wide range of problems.
The cannabis plant will begin to accept a higher concentration of nutrients within a week or two as it begins to recover. To provide the plant with the resources it needs to move on to the next steps, you should start to consider increasing the dosage.
Become a professional weed grower with The Seed Fair
Transplanting cannabis is a fun experience and provides vital hands-on training with your own weed plants. To get started you’ll need top-quality genetics that are able to bounce back quick enough to get back on track for a big yield. The Seed Fair works with many breeders to bring you the most stable strains you can find. With free shipping over $99 and free seeds with every order there is really no reason not to buy seeds with us today!


