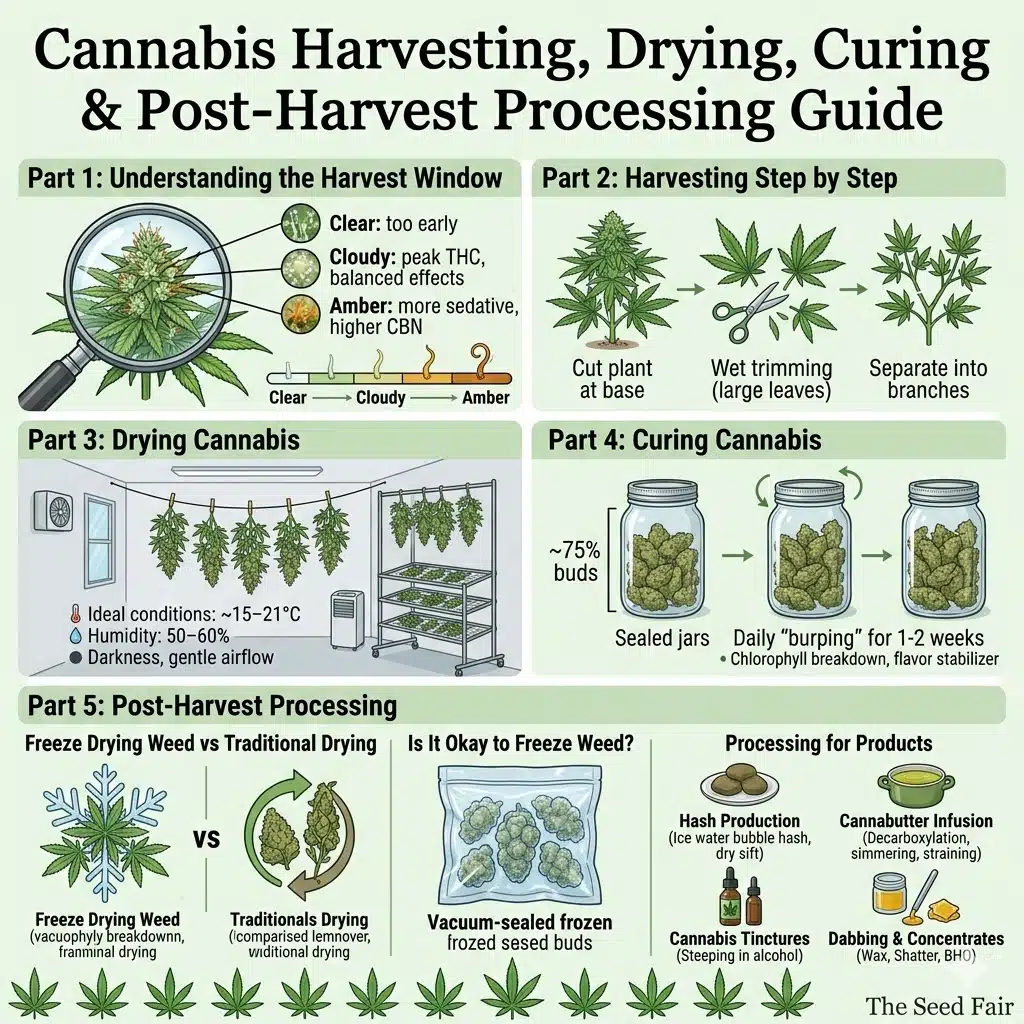
Cannabis Harvesting, Drying, Curing & Post-Harvest Processing Guide
Jun
Cannabis cultivation does not end when flowering finishes. In many ways, this is where some of the most important decisions are made. Harvest timing, drying conditions, curing methods, and post-harvest processing all determine whether a grow produces harsh, underdeveloped flower or smooth, aromatic, high-potency cannabis.
Growers often underestimate how much quality is “locked in” after the plant is cut. In reality, harvesting and post-harvest handling can preserve or destroy weeks of cultivation effort in a matter of days.
This pillar brings together the complete post-flowering process — from identifying the right harvest window to drying, curing, freezing, and transforming cannabis into concentrates like hash, cannabutter, tinctures, and more.
Understanding the Harvest Window: Timing Is Everything
Harvest timing is one of the most important decisions in cannabis cultivation. Cutting too early results in underdeveloped cannabinoids and weak potency. Harvesting too late leads to degraded THC levels and more sedative effects.
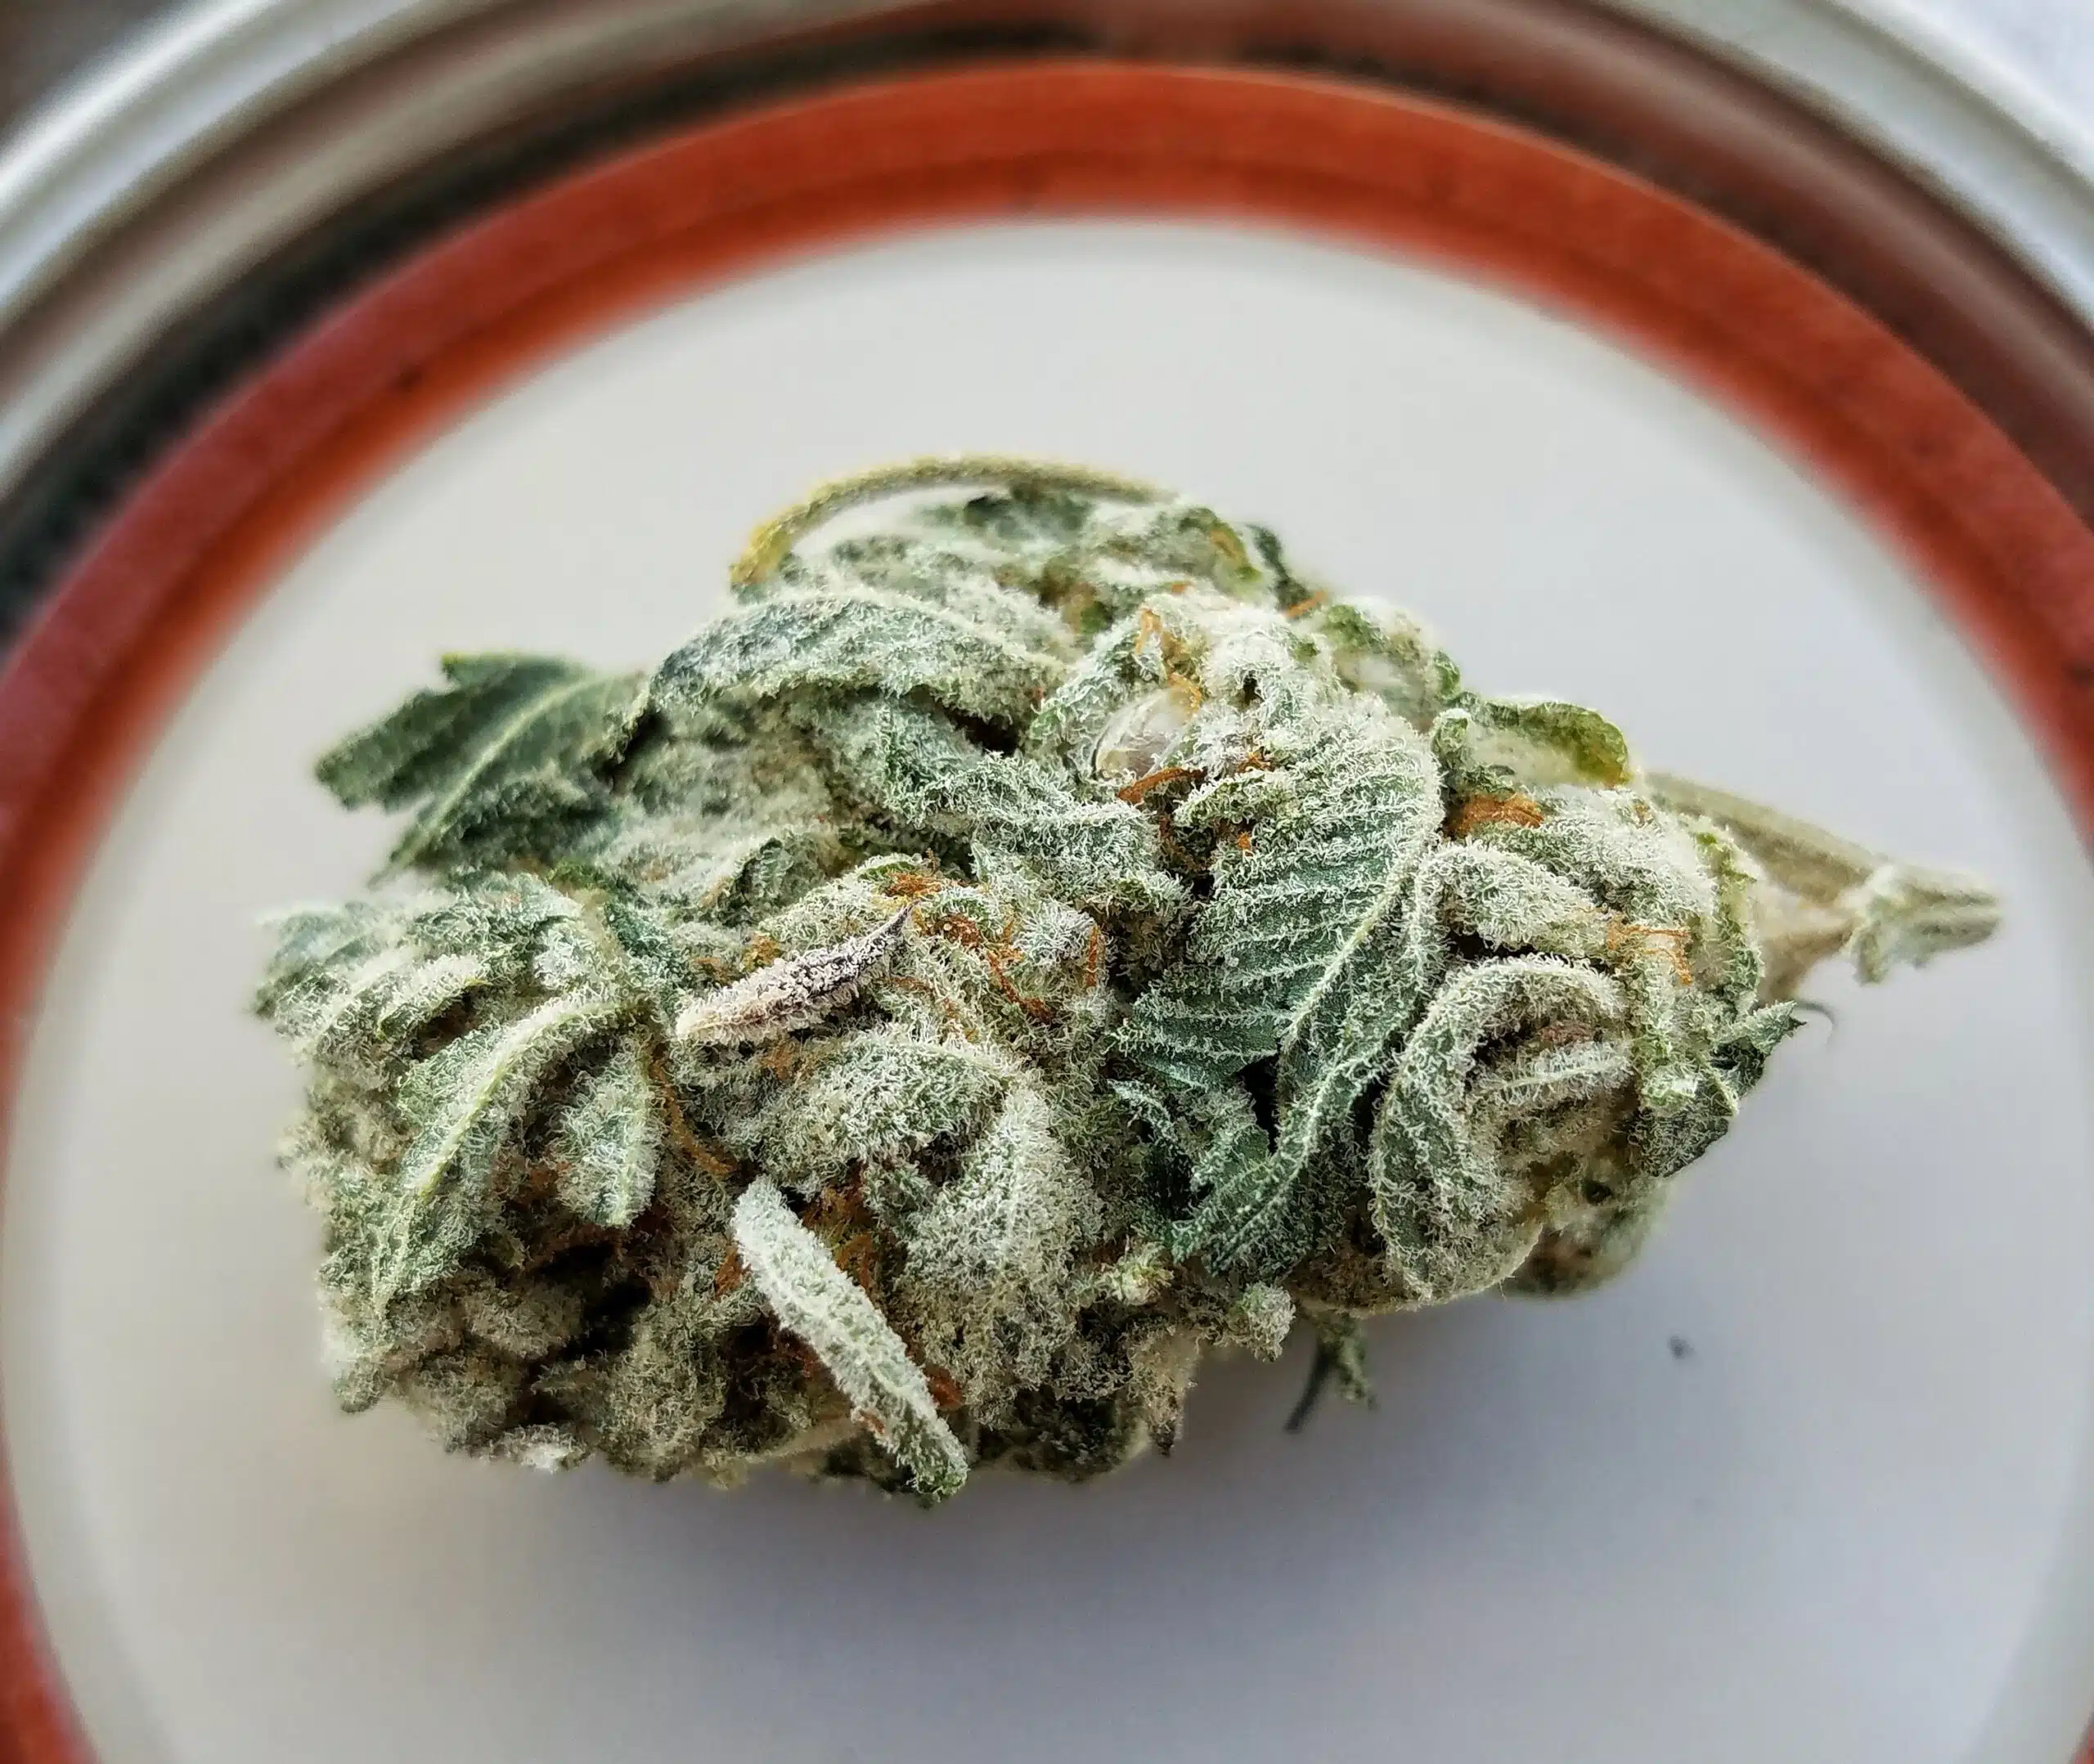
The plant signals readiness through trichome and pistil development. Experienced growers rely heavily on trichome color as the most accurate indicator. If you’re unsure how to evaluate maturity in real growing conditions, our guide on when to harvest cannabis explains the key signs to watch for before cutting your plants.
Typical trichome stages:
- Clear: too early, low potency
- Cloudy: peak THC levels, most balanced effects
- Amber: more sedative, higher CBN conversion
At the same time, pistils (the hair-like structures on buds) begin to darken and curl inward, indicating maturation.
Outdoor growers must also consider environmental factors such as rain risk, humidity spikes, and seasonal temperature drops, which can force earlier harvesting decisions.
Harvesting Cannabis Plants Step by Step
Harvesting is not just cutting the plant — it is a controlled process that preserves trichomes, structure, and terpene integrity.
A typical harvest sequence includes:
- Cutting the plant at the base or branch level
- Removing large fan leaves (often called “wet trimming”)
- Separating buds into manageable branches
- Preparing for drying in a controlled environment
The key principle is minimizing unnecessary handling. Every touch can dislodge trichomes, which contain cannabinoids and terpenes.
Growers often choose between wet trimming immediately after harvest or trimming once the buds have dried. Both approaches have advantages depending on humidity, drying conditions, and personal workflow. Our comparison of wet trim vs dry trim cannabis explores the benefits and trade-offs of each method.
Autoflower Harvest Timing: A Different Rule Set
Autoflowering plants do not rely on light cycles to flower, which changes how harvest timing is approached. Instead of watching environmental cues, growers must track lifecycle progression.
Autoflowers typically mature within 8–12 weeks, but timing varies depending on genetics.
Key autoflower harvest considerations:
- No ability to “extend veg” for recovery
- Trichome monitoring becomes essential
- Stress during late flowering cannot be corrected
- Overfeeding or late training can permanently reduce yield
Because of their fixed lifecycle, autoflowers reward precision more than intervention.
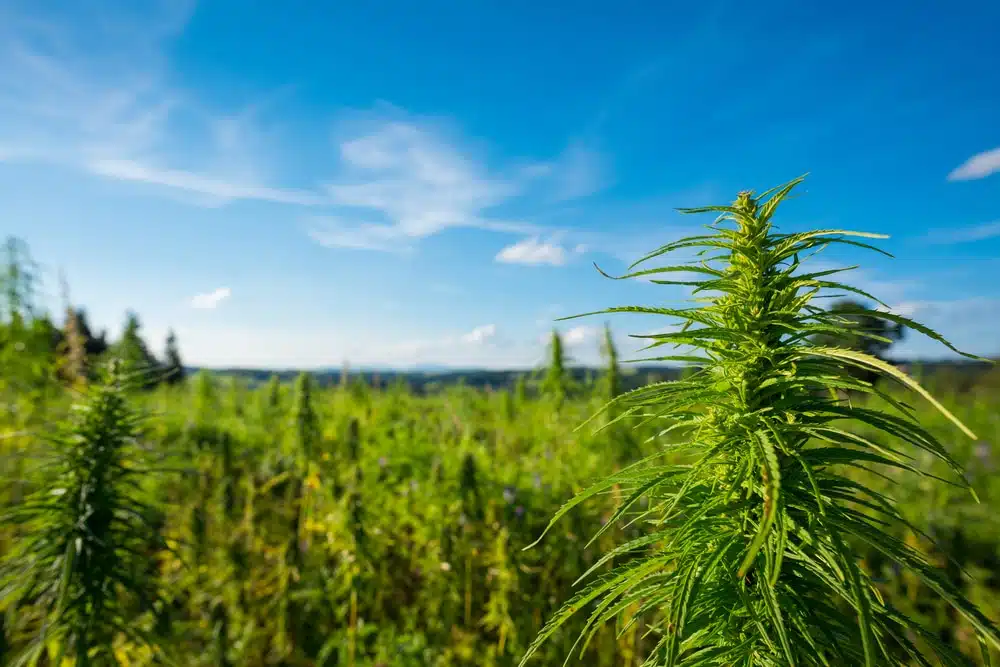
When Cannabis Begins Flowering Outdoors
Outdoor flowering is triggered naturally as daylight hours shorten. This transition typically begins in late summer, depending on latitude.
Early flowering signs include:
- Formation of small pre-flowers at node sites
- Noticeable stretch in plant height
- Shift in nutrient demand (less nitrogen, more phosphorus and potassium)
- Strong resin production increase
Understanding this transition is essential because flowering onset determines the entire harvest timeline.
Can You Leave Buds on Too Long?
Yes — leaving buds on the plant past peak maturity can significantly affect quality.
When harvest is delayed too long:
- THC degrades into CBN (more sedative effect)
- Terpenes begin to evaporate
- Bud structure becomes overly heavy and can degrade
- Risk of mold increases in humid conditions
The plant does not “improve” indefinitely. There is a peak window where potency, flavor, and resin content are at their highest.
Drying Cannabis: The First Critical Post-Harvest Stage
Drying is where most beginners lose quality without realizing it. The goal is slow moisture reduction in a controlled environment.
Ideal drying conditions:
- Temperature: ~15–21°C
- Humidity: 50–60%
- Darkness (to preserve cannabinoids)
- Gentle airflow (never direct wind on buds)
Buds are typically hung upside down or placed on drying racks to allow even moisture release.
A proper dry usually takes 7–14 days depending on bud size and environmental stability. Learning how to dry cannabis properly helps preserve terpene content while reducing the risk of mold and overly harsh flower.
Curing Cannabis: Where Quality Is Fully Developed
Curing is often misunderstood as optional, but it is one of the most important steps in cannabis quality development. While drying removes moisture, curing stabilizes flavor, smoothness, and potency.
During curing, chlorophyll breaks down, harsh plant notes fade, and terpene profiles mature.
A proper cure includes:
- Sealed glass jars filled ~70–80%
- Daily “burping” (air exchange) for the first 1–2 weeks
- Gradual reduction of burping frequency over time
Well-cured cannabis becomes smoother, more aromatic, and more stable over long storage periods. Our guide on how to cure cannabis explains the curing process step by step, including jar management and long-term storage practices.
Freeze Drying Weed vs Traditional Drying
Freeze drying is a modern post-harvest method used to preserve terpene content and speed up processing time.
Instead of slow air drying, freeze drying removes moisture through sublimation at low temperatures.
Advantages include:
- Faster drying time
- Better terpene preservation in some cases
- Reduced mold risk
- More consistent moisture control
However, it requires specialized equipment and is not commonly used in small-scale grows.
Is It Okay to Freeze Weed?
Freezing cannabis is controversial because it can preserve cannabinoids but damage physical structure if handled incorrectly.
Freezing is sometimes used for:
- Long-term storage
- Making hash or ice-water extraction
- Preserving bulk harvests temporarily
However, freezing can also cause:
- Trichome brittleness and breakage
- Moisture expansion inside plant material
- Loss of aroma if not sealed properly
If freezing is used, buds should be vacuum-sealed or tightly containerized to prevent moisture exposure and physical damage.
Processing Cannabis After Harvest
Once cannabis is dried and cured (or sometimes before full curing depending on method), it can be transformed into a wide range of products. Starting with high-THC cannabis seeds can provide more resin-rich flower for growers interested in making concentrates, hash, or other post-harvest products.
-
Hash Production
Hash is one of the oldest cannabis concentrates, made by separating trichomes from plant material.
Common methods include:
- Dry sifting
- Ice water extraction (bubble hash)
- Manual collection (kief pressing or hand rubbing)
Hash quality depends heavily on trichome purity and drying technique.
-
Cannabutter(Infused Butter)
Cannabutter is the foundation of most homemade edibles. It relies on fat-based extraction to bind cannabinoids.
The process begins with decarboxylation, where heat activates THC from THCA. Without this step, potency remains extremely low.
Key steps include:
- Decarbing cannabis in low heat
- Infusing into butter at controlled temperature
- Slow simmering for cannabinoid extraction
- Straining plant material
- Cooling and separating water content
Cannabutter potency varies widely depending on strain, infusion time, and temperature control.
-
Cannabis Tinctures
Tinctures are alcohol-based cannabis extracts designed for fast absorption and precise dosing.
They are made by steeping decarboxylated cannabis in high-proof alcohol for days or weeks.
Key benefits include:
- Long shelf life
- Fast onset compared to edibles
- Easy micro-dosing
- No combustion required
Tinctures can be taken sublingually or added to food and beverages.
-
Cannabis Dabbing and Concentrates
Dabbing refers to consuming concentrated cannabis extracts such as wax, shatter, or oils using high heat vaporization.
These concentrates contain extremely high THC levels compared to flower.
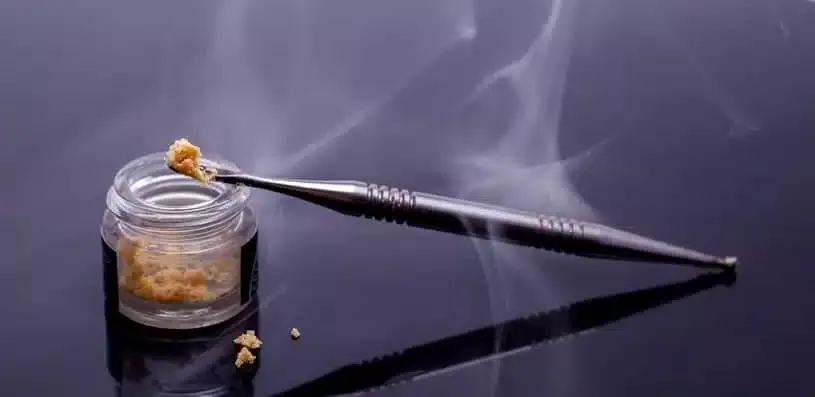
Common forms include:
- Wax
- Shatter
- Budder
- Butane hash oil (BHO)
Dabbing delivers fast, intense effects but requires careful temperature control to avoid degradation of compounds.
-
Extracting THC From Trimmings
Trim material is often underestimated, but it contains significant trichome value.
Extraction methods include:
- Alcohol-based extraction
- Ice water separation
- Dry ice agitation
- Closed-loop solvent systems (advanced setups)
The goal is to separate cannabinoids and terpenes from plant waste and convert them into usable concentrate forms.
From Harvest to Final Product: The Full System
Harvesting is not a single action — it is part of a larger post-growth system that determines final product quality.
A complete workflow looks like this:
- Harvest at peak trichome maturity
- Dry slowly in controlled conditions
- Cure for flavor and smoothness
- Store properly (cool, dark, stable humidity)
- Process into desired end products
Each stage compounds the next. A perfect harvest can still be ruined by poor drying, and perfect drying can still be ruined by improper curing.
Final Takeaway: Post-Harvest Determines Final Quality
Cannabis quality is not finalized in the grow tent. It is finalized after harvest.
Growers who consistently produce high-quality cannabis understand one core principle:
The plant is only half the product — post-harvest handling completes it.
Drying preserves structure. Curing develops character. Processing unlocks versatility.
When these systems are executed correctly, cannabis becomes not just a flower — but a full material system capable of producing concentrates, edibles, oils, and extracts with completely different experiences.
Alexander Broodryk is a very skilled grower and has been writing about his experiences online for many years. With over 5 years in the Cannabis Industry Alexander is not only engaging with many of his audiences but also informational. Alex has a lot of writings about Cannabis all over online and we are very happy to have him here at The Seed Fair helping to contribute his well thorough content for our website. He is dedicated to educating readers on the latest developments and trends in this rapidly evolving market. Check out his biography under our Author pages at Alexander Broodryk, Author at The Seed Fair.