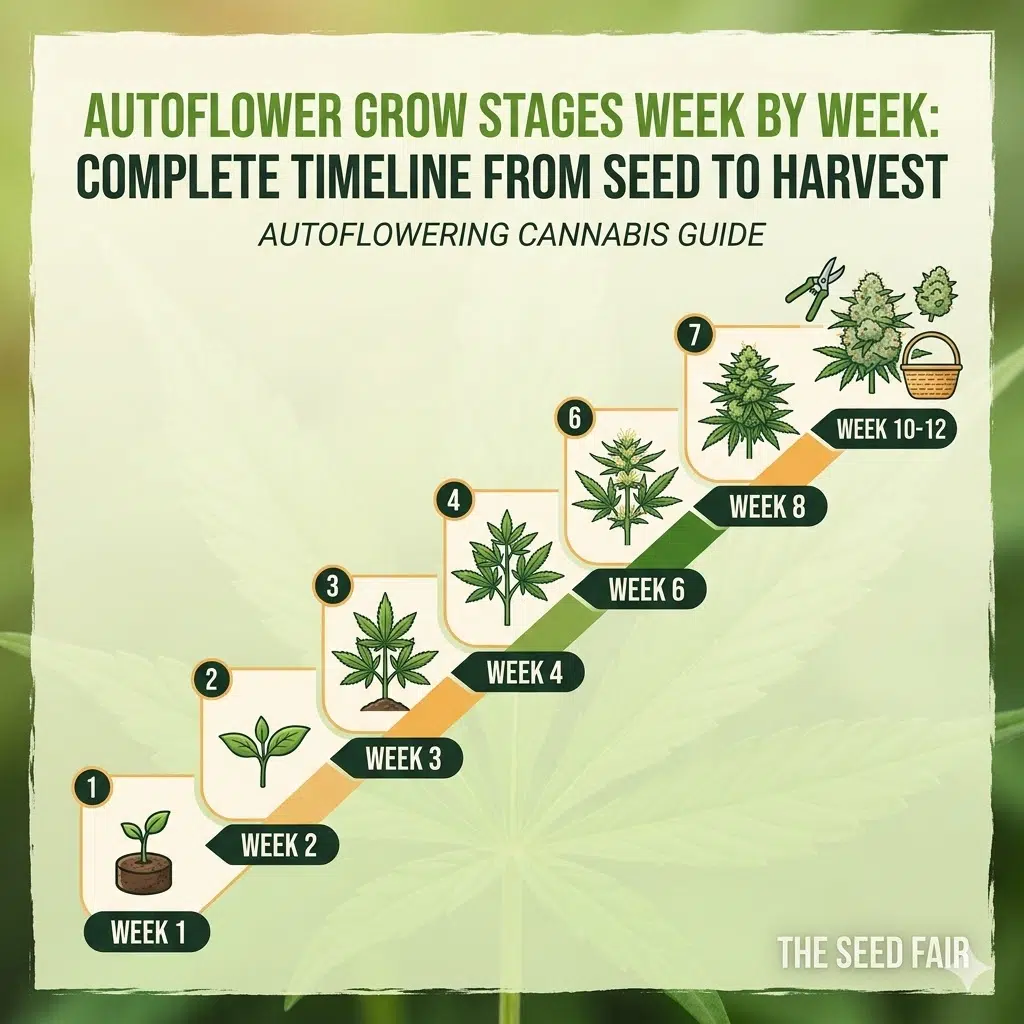
Autoflower Grow Stages Week By Week: Complete Timeline From Seed To Harvest
Jun
Growing autoflowers successfully starts with understanding how they develop from week to week. Unlike photoperiod cannabis, autoflowering strains operate on a genetic timer. They don’t wait for changes in the light cycle before entering flowering, which means every week of growth matters.
One of the biggest mistakes new growers make is treating autoflowers like traditional cannabis plants. Because autos have a shorter life cycle, delays caused by overwatering, transplant stress, poor lighting, or nutrient problems can significantly reduce yields.
This guide walks through the complete autoflower growth stages week by week so you know what to expect and what your plants need at each stage.
Week 1: Germination and Early Seedling Stage
The first week begins when your seed cracks and develops its taproot.
Once planted, the seedling emerges with two small cotyledon leaves. These rounded leaves are not true cannabis leaves but provide the energy needed for initial growth.
What to Expect
- Seedling height of 1–3 inches
- Cotyledon leaves fully open
- First true leaves begin forming
- Very delicate stem structure
Grower’s Tips
Keep humidity between 70–80%.
Avoid feeding nutrients during this stage if using quality soil. The seed contains enough energy to support early development.
Overwatering is the most common mistake during week one. Water only when the growing medium begins to dry.
Week 2: Seedling Development
By week two, your autoflower begins producing additional sets of true leaves.
The root system expands rapidly underground, even though visible growth above the soil may appear slow.
What to Expect
- 2–4 sets of serrated leaves
- Stronger stem development
- Height between 3–6 inches
- Vibrant green foliage
Environmental Targets
- Temperature: 70–78°F (21–26°C)
- Humidity: 60–70%
- Light Schedule: 18/6 or 20/4
At this stage, many growers begin introducing light vegetative nutrients at approximately one-quarter strength.
Week 3: Early Vegetative Growth
Week three marks the beginning of serious growth.
This is often when growers first notice rapid development as roots become established and foliage production accelerates.
What to Expect
- Faster vertical growth
- Additional nodes forming
- Larger fan leaves
- Strong root expansion
Healthy autoflowers may double in size during this week.
What To Do
Begin low-stress training (LST) if desired.
Many experienced growers start tie-down training around day 18–21 because stems remain flexible while the plant is strong enough to recover quickly.
Avoid topping or aggressive pruning.
Week 4: Late Vegetative Stage
Week four is often the final full week of vegetative growth.
Autoflowers focus heavily on producing leaves, branches, and bud sites before transitioning into flowering.
What to Expect
- Noticeably bushier plants
- Increased branching
- Larger fan leaves
- Potential preflowers at nodes
Nutrient Focus
Nitrogen remains important during this stage.
Healthy vegetative growth provides the foundation for heavy flowering later.
One mistake many growers make is switching to bloom nutrients too early. Continue vegetative feeding until flowering becomes obvious.
Week 5: Pre-Flowering Stage
The pre-flower stage is where many growers get excited.
Female plants begin displaying pistils at the nodes, confirming sex and signaling the start of reproductive growth.
What to Expect
- White pistils appear
- Vertical stretching accelerates
- Additional bud sites develop
- Increased water consumption
Environmental Targets
- Humidity: 45–55%
- Temperature: 68–78°F
- Strong airflow
This stage often determines final plant size.
Healthy plants continue stretching for another one to two weeks before focusing completely on flower production.
Week 6: Early Flowering Stage
Week six marks the beginning of true flowering.
Energy shifts away from leaf production and toward bud development.
What to Expect
- Visible flower formation
- Trichomes begin appearing
- Stronger aroma develops
- Stretching slows
Many growers notice a significant increase in nutrient demand during this period.
Nutrient Focus
Transition toward bloom nutrients with higher phosphorus and potassium levels.
Nitrogen should still be present but reduced compared to vegetative feeding.
Week 7: Flower Development
Week seven is when many autoflowers begin looking like mature cannabis plants.
Bud sites start stacking together and resin production increases noticeably.
What to Expect
- Larger flower clusters
- Increased trichome production
- Strong cannabis aroma
- Reduced vertical growth
Grower’s Tips
Monitor humidity carefully.
Dense flowers combined with poor airflow can increase the risk of mold and bud rot.
Support heavy branches if needed.
Week 8: Mid Flowering
For many autoflower strains, week eight represents peak flower production.
Plants direct most available energy into bud growth.
What to Expect
- Bud swelling accelerates
- Pistils remain mostly white
- Trichome coverage expands
- Aroma intensifies
Common Mistakes
Many beginners start flushing too early.
Unless harvest is approaching quickly, continue feeding bloom nutrients to maximize flower size and density.
Week 9: Late Flowering
Week nine is where harvest preparation begins.
While some fast autoflowers may finish now, many continue developing for another one to three weeks.
What to Expect
- Swollen buds
- Darkening pistils
- Cloudy trichomes emerging
- Fan leaves beginning to fade
The plant naturally starts consuming stored nutrients from older leaves.
Yellowing during late flower is often normal.
Week 10: Ripening Stage
Ripening is different from flowering.
The plant isn’t necessarily producing larger buds anymore. Instead, cannabinoids, terpenes, and resin mature.
What to Expect
- Dense flowers
- Cloudy trichomes
- Some amber trichomes appearing
- Strong aroma
Harvest Readiness
A jeweler’s loupe helps determine maturity.
Most growers harvest when:
- 80–90% cloudy trichomes
- 10–20% amber trichomes
This typically provides a balanced cannabinoid profile.
Weeks 11–12: Extended Flowering Strains
Not all autoflowers finish in ten weeks.
Larger sativa-dominant autoflowers frequently require 11–12 weeks from seed to harvest.
Signs Harvest Is Approaching
- Trichomes mostly cloudy
- Pistils darkened and curled
- Buds hard and dense
- Water consumption decreases
Patience during this stage often rewards growers with heavier yields and improved potency.
Factors That Affect Autoflower Growth Speed
No two grows are identical.
Several factors influence how quickly an autoflower progresses through its life cycle.
Genetics
Some strains finish in eight weeks.
Others require twelve weeks or more.
Lighting
Strong, consistent lighting accelerates growth and improves yields.
Most growers use:
- 18/6 schedule
- 20/4 schedule
throughout the entire life cycle.
Nutrients
Underfeeding slows development.
Overfeeding can cause nutrient burn and stunt growth.
Pot Size
Autoflowers perform best when started in their final container.
Transplant stress can reduce growth and final yields.
Environment
Temperature, humidity, airflow, and root-zone health all impact development speed.
Common Problems During Autoflower Growth
Stunted Growth
Usually caused by:
- Overwatering
- Poor root development
- Transplant shock
- Low temperatures
Yellow Leaves
May indicate:
- Nitrogen deficiency
- Overwatering
- Natural late-flower fade
Slow Flowering
Often caused by:
- Genetics
- Environmental stress
- Inconsistent lighting
Frequently Asked Questions
How long does an autoflower take from seed to harvest?
Most autoflowers finish between 8 and 12 weeks from seed.
When do autoflowers start flowering?
Most strains begin showing preflowers between weeks 4 and 6.
Can autoflowers stay in vegetative growth longer?
No. Autoflowers flower according to age rather than changes in light schedules.
Should I defoliate autoflowers?
Only lightly and during vegetative growth. Excessive defoliation can slow development.
Can I increase autoflower yields?
Yes. Proper lighting, healthy roots, low-stress training, and consistent environmental conditions can significantly improve yields.
Final Thoughts
Understanding autoflower grow stages week by week removes much of the guesswork from cultivation. Each stage requires slightly different environmental conditions, nutrient levels, and maintenance strategies.
The growers who consistently produce large, healthy autoflower harvests are usually the ones who pay close attention to timing. By knowing what your plant should look like at each stage, you can spot problems early, make adjustments quickly, and maximize both yield and quality.